thefrozencoder

Programming and Technology blog

How I got my 15 year old CanonScan LIDE 500F scanner working in Windows 10

I have and old Canon Scanner (CanonScan LIDE 500F) that I wanted to get working to scan some documents quickly, getting it to work in Windows 10 was not as difficult as I thought.

  1. Get the Twain Drivers here: https://www.usa.canon.com/internet/portal/us/home/support/details/scanners/support-scanners-canoscan-series/canoscan-lide-500f?tab=drivers_downloads and select Windows 7 (x86 or x64) version
  2. Download the CanoScan Toolbox v4.9 from the software tab.
  3. Unpack the Twain Drivers with 7Zip to your desktop (even though it's an exe it will still unzip using 7Zip)
  4. Plug the Scanner into windows and use the Device Manager to update the drivers on the device by browsing to the folder you unpacked the drivers in the previous location (this is what I did you might be able to just install the drivers with the setup)
  5. Install the Toolbox software and restart
  6. Add the following path to the PATH variable in Windows C:\Windows\twain_32\CNQL500
    1. This is to avoid the "Unable to open TWAIN source" when you try and scan from the toolbox.

You should be able to scan from the toolbox software.

Installing a 3rd party expansion bay in my laptop

I recently purchased a 3rd party expansion bay caddy (replacement part AK868AA) for my HP EliteBook 8350p laptop so I could have two HD's as well upgrade my original HD to a 7200rpm larger drive.  I would end up installing the new HD as my primary and use the original as a secondary "data" drive for music, videos, VM's and other large files.

I purchased the expansion bay caddy from a 3rd party company (NewmodeUS.com) off of their eBay store and had no problems with the transaction.  Upon receiving the caddy I also noticed that there were no instructions but really how hard can it be right?

Actually I did have one issue when I went to install the caddy into the laptop, it involved a little extra work so I found.  Below is the process I used to install the HD into the caddy and into my laptop.  It does not explain how to remove the original HD and replace it with the new HD.  HP has manuals for that on their site.

The following steps are done at your own risk and I cannot take any responsibility if any damaged is caused by you or to your laptop.  To make things easier my laptop was sitting with the battery compartment facing up or away from me.

Step 1: Remove the battery from the laptop.

Step 2: Remove the original expansion bay caddy (the one that holds the DVD player) by unscrewing the screw that fastens the expansion bay caddy to the laptop chassis and using a flat head screw driver push on the silver tab in the picture to the left to pop the caddy out far enough so you can remove it (see image below as a reference).
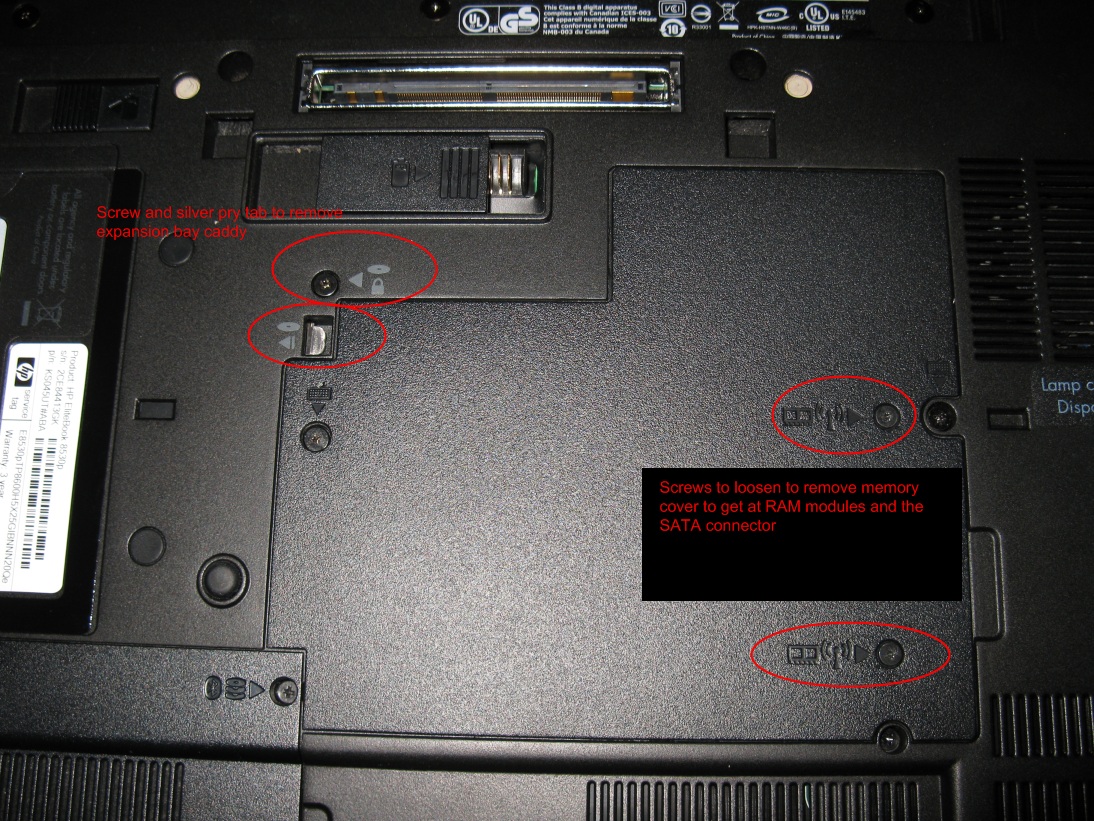
Step 3: Prep your new expansion bay caddy by installing your new hard drive, make sure to screw the HD to the caddy and transfer the fastening mounting bracket from the existing caddy to your new caddy using the supplied screws
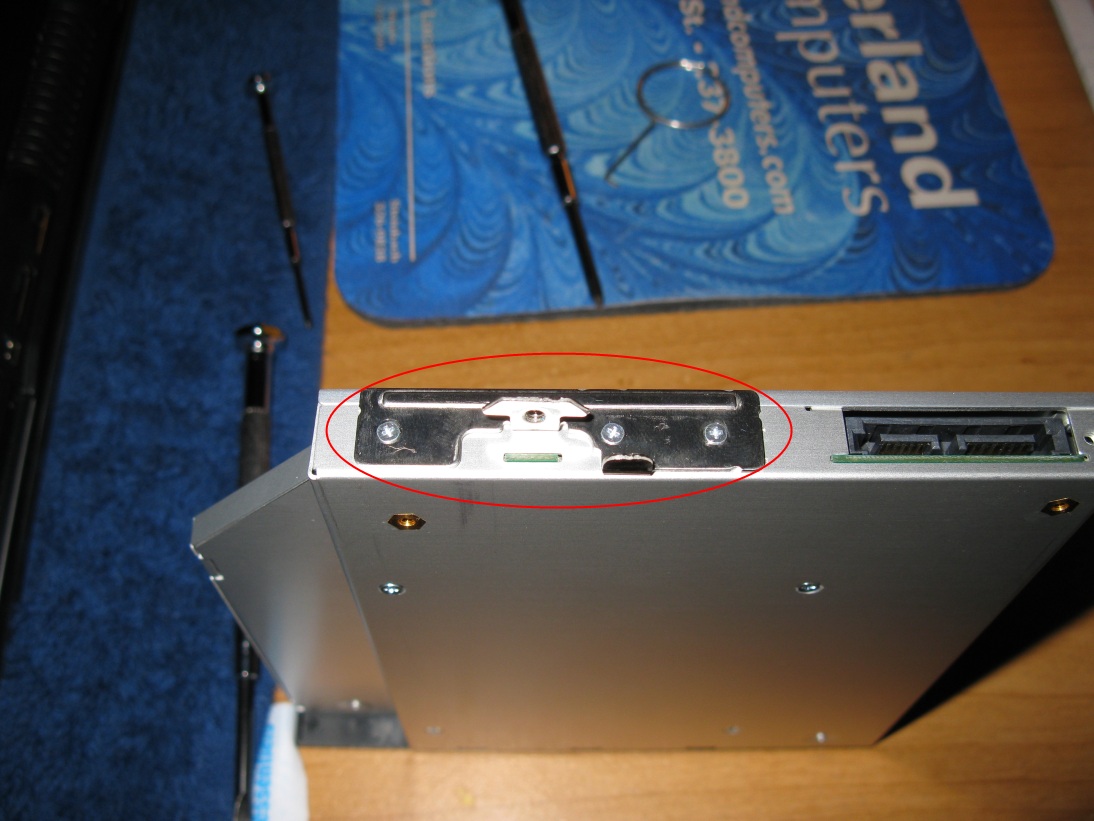
Step 4: Use 3 screws from the supplied screws and fasten your new expansion bay cover, there are 3 screw holes on the bottom of the expansion bay caddy so that the case stays closed.

Step 5: Slide the expansion bay caddy into the expansion bay is flush with the laptop case or until you feel it cannot go in anymore.  The silver tab you pried to release the caddy should be visible in the slot, if you do not see the little silver tab then you may have to follow steps 6 - 9.

Step 6: Remove the memory cover by unscrewing two screws pictured below and lift and slide the cover to the right.

Step 7: If you have memory in the bay closest to the expansion bay caddy (left memory bay) you might want to remove it by prying the two sliver retainers  on each end of the RAM module away from the center of the RAM module, the RAM module will pop up at an angle so you can remove it.
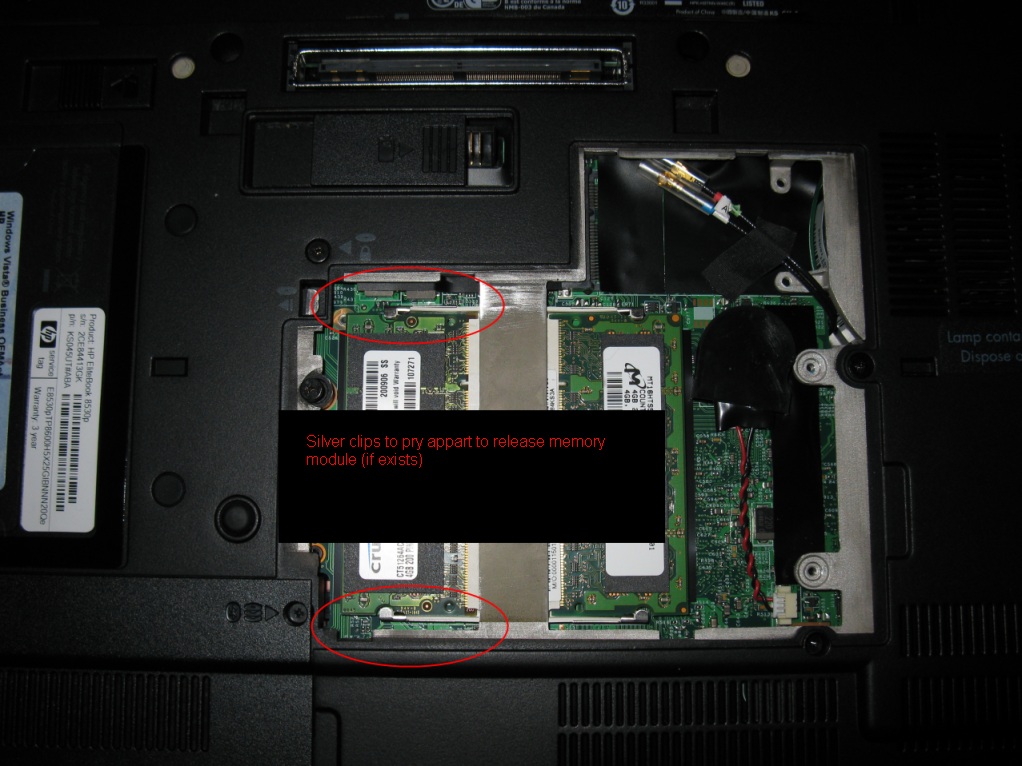
Step 8: If you look at the picture below you will see the grey connector (circled in red), this is the expansion bays SATA connector (do this by looking inside of the laptop at an angle toward the expansion bay slot).
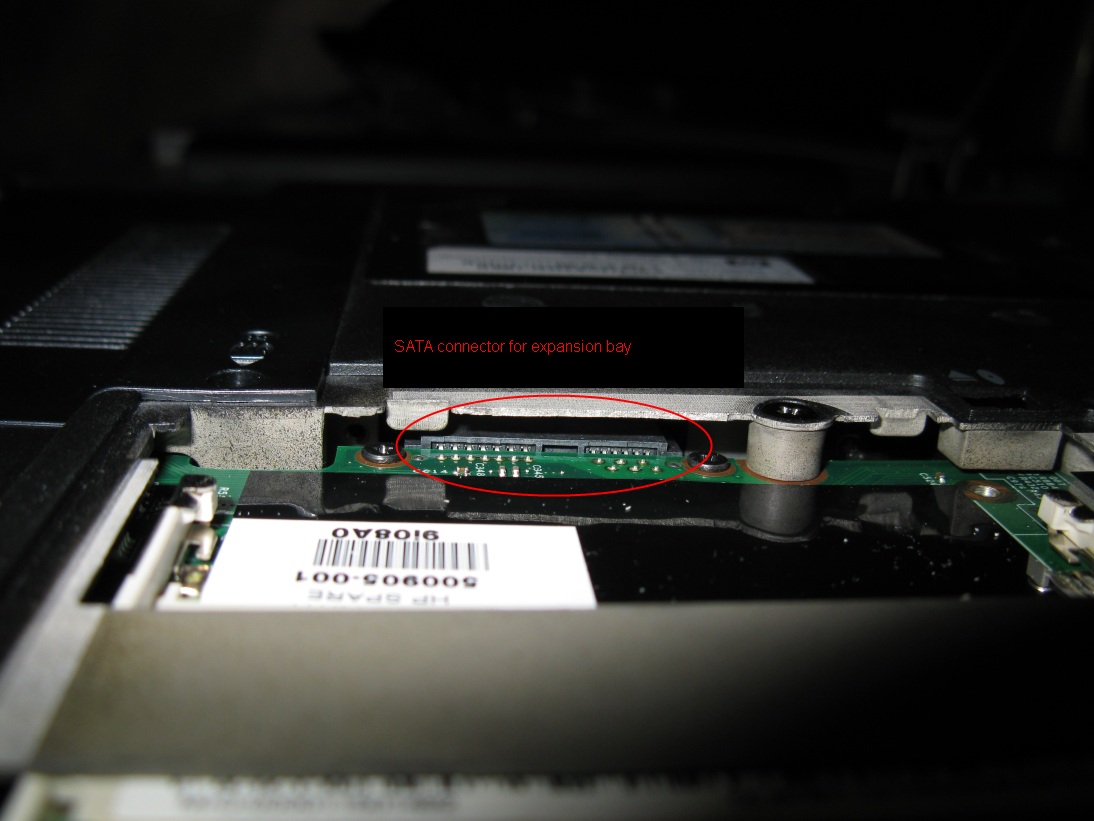
Step 9: Slide the expansion bay caddy into the slot until it stops.  Slide the flat head screw driver under the chassis so that it rests on the SATA connector then lift up on the screwdriver using the chassis as a leverage point so you can carefully push the SATA connector downwards slightly.  At the same time push the expansion bay caddy in.  The caddy should slide the rest of the way in (it did in my case but your mileage may vary based on the laptop model).  You now should see the little silver tab you had to pry to get the DVD player out.

Step 10: Once this is done screw the fastening screw down and put back all the covers/memory/screws you removed.

Turn on your laptop and hopefully you should see your new drive.

Note: if you were like me and you made the new HD your primary drive and used the original HD as the drive to go in the expansion bay you will need to go into the BIOS and make sure the expansion bay device is NOT the first device to boot from in the list.  If you don't well your old HD will boot.

Note: Because the second drive is not buried in the laptop you will notice the noise when the second drive is being accessed, it is no way louder than the DVD drive when being accessed but you will notice it if you are copying large or a large amount of files to and from it.

Windows 7 on my HP EliteBook 8530p

I was able to install Windows 7 Professional (x64) on my Dev laptop today.  It didn’t take that long to install and once up and running I had 6 Unknown Devices present in the Device Manager.  All I had to do for 4 of them was right click on the device and Update Driver from internet.  Windows Update recognized the 4 devices and downloaded drivers for them.  This is a list of the drivers that had to be downloaded or installed manually:

  • Ricoh Memory Stick Host Controller (driver downloaded from windows update)
  • Ricoh SD/MMC Host Controller (driver downloaded from windows update)
  • Ricoh xD-Picture Card Controller (driver downloaded from windows update)
  • AuthenTec Inc. AES2810 (Finger print sensor) (driver downloaded from windows update)
  • HP Drive Guard Driver (download HP 3D Driveguard (Vista) softpaq sp39410.exe)
  • Direct Application Launch Button (download HP Quick Launch Buttons (softpaq sp43616.exe))

Once the drivers where updated manually I noticed that I had 4 new Windows Updates to download all of which were the following drivers:

  • A newer AuthenTec Inc. AES2810 driver
  • A newer ATI Mobility Radeon HD 3650 driver
  • A newer Intel(R) 82567LM Gigabit Network Connection driver
  • A newer Agere Systems HDA Modem driver

All in all a pretty clean and simple install.  That probably more so because the the hardware is fairly new.

The only thing that does not work properly is the mute button (part of the quick launch buttons).  Not a big deal I will probably just have to update the software when HP updates its library for Win7 in October.  Other than I am really liking Win7 so far on this laptop, it runs very well alongside the 8GB of RAM I have installed.

Update: 2009-08-08 - Seems I was wrong about the mute button it does work, however it does not register to Windows that the mute button is enabled so Windows does not display the little red disabled symbol on the speaker icon in the notification area.

Update: 2009-08-29 – I was able to get the AuthenTec Inc. AES2810 finger print reader setup to login to Windows 7 with my fingerprint, it works like a charm.  To do this you will need to download the BETA version of the enrolment software here:

The blog site Three Wise Men has a tutorial on how to actually install, setup and enroll your finger print so you can start using this feature.

Update: 2009-10-22 - HP has started to release updated drivers for the 8530p which the new audio driver has fixed my mute button issue listed above.  As of todays date (2009-10-22) there are no Windows 7 Professional (x64) drivers.  I have installed the Windows Home (x64) drivers and they seem to work as expected.  Visit the HP site here.

New personal laptop

So I have been doing my homework on laptops over the past month-ish because I wanted to replace my “desktop replacement” laptop (17” HP DV9418CA) with a more portable yet still functional for what I really use it for laptop.  Don’t get me wrong my current lappy is a fine machine (when running XP pro) and has a lot of bells and whistles but portable it isn’t and lacks in the memory dept (max 2GB).

I have owned 3 laptops over the last 5-6 years; all have been HP and never had any issues to date.  Because of this HP was top of the list for a replacement but unfortunately their latest line based on my research has had some cooling issues along with some lackluster components (LCD display, HDs) (this based on the chatter of various user forums I used for research not actual defects).

Some of my requirements were:

  • 2.0 GHz or higher dual core CPU
  • No Nvidia GPU (search for nvidia gpu die defect))
  • Supports over 4GB RAM
  • Supports Wireless B, G, N
  • Supports 10/100/1000 GB LAN
  • Supports Bluetooth
  • 15.4” (or less) LCD (matte finish) (supports 1280 x 800 or higher)

I ended up dropping the consumer grade and moving into the business class machines which are more expensive but it is all relative since the features you would pay for on a consumer machine you get automatically in a business machine for example a basic 3 year warranty.

In the end I picked the HP EliteBook 8530p, it had all of the requirements, was a name I trusted based on previous experience, was given better than average reviews on various sites that review laptops and had lots of satisfied users on the various user forums.  Also I was impressed by the actual technology that went into the design and structure of the 2008 models as seen here in this breakdown video made by HP.  Now maybe it’s all FUD but none the less I have had the laptop for a week and so far it has gone above and beyond my expectations (knock on wood).

The laptop came with no applications installed other than the HP software and the drivers which was cool; no other crappy trial-ware garbage to remove, packaging was very simple yet effective.  The machine came with Vista Business SP1 (x64) and a downgrade license for XP (x86), I stuck with Vista.  I also purchased Office 2007 Pro and bit the bullet; a 4GB PC6400 memory module from Crucial bringing the total memory to 6GB.

Note: I purchased the memory through TigerDirect.ca by calling one of the sales team directly.  Even though they don't list the memory they can purchase anything from their suppliers at a discounted cost.  The memory module ended up costing less going this route (pricing for this item on CAN sites was often over $500 bills if you could find it) than it would have buying it directly from Crucial w/exchange w/shipping w/brokerage fees, plus I got 2 day delivery on the memory for the price of ground shipping FTW!!!

The Hyper-V n00b - Child Partition - OpenBSD 4.4

So far I have really zero issues with installing Windows based OS's (once each one had the latest service pack) as child partition, what about unsupported OS's.  I figured that I would need to install a familiar OS that I have lots of experience with and I would like to work with it some more, especially from the firewall side of things again.  Of course my choice was crystal clear; OpenBSD.  Now I wondered just how well the "virtual hardware" would work, I have installed OpenBSD in Virtual PC which worked pretty well so what do I have to loose?

Since you can mount an ISO to your CD/DVD drive when creating a new virtual machine I downloaded the install44.iso for OpenBSD and selected it and started the VM.  From what I can see the only thing that wasn't supported was the Microsoft VGA adapter.  But since it probably supports the VGA standard it still worked.  So after about 5 minutes of installing and configuring I rejoiced to see the following screen.

Now of course I will need to run further tests but it shows promise.  Adding another NIC and the possibility of having this as my firewall to the internet has some pretty strong advantages.  I only hope that I still have my old config files kicking around for my last firewall but I am sure that I will manage.

Of course things like the shutdown actions in the toolbar do not work and since there are no Integration Services there is no Heartbeat monitor but hey, it's working none the less.  I also noticed that the time was 4 hours out which I am not sure about.  Maybe OpenBSD cannot read the timing from the virtual BIOS or whatever it used/called.  I will have to investigate that one.  Otherwise I can enable the OpenNTPD dameon just to make sure that the time is always in synch.