Introduction
One of the more common requests I see on various ASP.NET forums and discussion groups from new developers is how to upload an image and resize it. This simple example does just that.
The code samples in this article can be downloaded using the link at the bottom of this article. Samples were created using Visual Studio 2008 (ASP.NET Web Site). There are samples for both C# and Visual Basic.NET in the download file.
Requirements
-
The user wants to be able to upload an image to the system
-
The system must have a mechanism to allow images to be uploaded and saved to the file system
-
Images must be resized to conform to the layout restrictions of the site
-
Images must be stored in a folder called “Images”
-
Images must have a unique file name to avoid collisions from other users
-
System must store the original file as well as the resized image
The requirements here are pretty simple and for the most part don’t require any extra decision making. For this sample we are not going to worry about some possible issues such as file size, logic to deal with files that are not images being uploaded (people fooling around with the feature) and such.
Implementation
To implement the requirements the following files have been added to an ASP.NET Web Site, below are the files that make up the solution
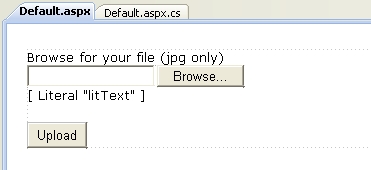
Default.aspx Page UI
The UI for the upload feature is simple
-
asp:FileUpload control so the user can select an image to upload from their computer
-
asp:Literal control so we can display a link to the uploaded original and resized image
-
asp:Button control to submit the request to upload and resize the image
Default.aspx Page code behind

We will need to add a couple of using (imports in VB) for the image handling as well as the file system handling lines, the System.Drawing and the System.IO.

The event handler for the button click
-
We check to see if the Page.IsPostBack is true which on this event is optional because it will always be a postback if the button is clicked, it is more of a coding practice than needed logic
-
If this condition is true we call the main method to handle our image upload logic

The logic to handle the image uploads
-
Line 28 – we get the actual physical path the web site is running under (this is needed so we can store the image later on)
-
Line 31 – make sure that there is a trailing forward slash on the end of the path
-
Line 35 – add our folder we will store the images in (this value could be stored in the appSettings section of the web.config file)
-
Line 38 – create the physical path to the images folder (you may get an exception here is the NETWORK SERVICE account (or which ever account is configured to run ASP.NET applications) does not have write access to the path being created
-
Line 42 – make our link template to the created files
-
Line 45 – start looping through the files in the Request.Files object
-
Line 49 – get an instance of the current file by index id
-
Lines 52 to 58 – create and fill a byte array of the current uploaded file (this will be used to resize the image and to write the image to the file system)
-
Line 61 – create a unique file name for our image (this unique identifier could be saved to the users profile in a database to associate the image to the user)
-
Lines 64 to 67 – write the original file to the file system and update the literal control with a link to the file
-
Lines 71 to 74 – before writing the original image to the file system call the image resize logic, this will return a byte array with the resized image and then update the literal control with a link to the file
-
Line 78 – set the visibility of the literal control to true (this could be set outside of the loop by checking if the Request.Files.Count property is > 0
-
Line 79 – set the byte array to null to clean up any resources used

The logic to resize the image
This logic was not written by me but copied from the Personal Web Starter Kit that and is available as a download from asp.net. The new size value you pass in when calling this method will change either the height or width of the original image based on if the picture is a portrait or landscaped image this is done to maintain the aspect ratio and not have a distorted image.
Conclusion
This is a simple and no nonsense approach to this common feature and there are other things that could be addressed with this sample like client validation before an upload is done to make sure that the file picked has a certain extension and or if the user actually picks a file before the submit button is pressed, also the size of the image being uploaded, you may have to update the web.config to allow for a bigger file or put restrictions on the size being uploaded.
Code ImageUploadSample.zip (628.76 kb)