Introduction
This post goes about showing you how you can implement common global settings without using the web.config's appSettings section. The idea is simple and taken from the latest craze of document based databases like RavenDB. Why not create an object for your settings serialize it to a standard format and then just persist it to a file. Now you probably don’t want to go and store passwords and such in the file (unless you encrypt them first) but for the most common settings it’s a nice alternative to the web.config appSettings which is pretty limited. Now some people may say why not a database? Well unless you are running under a server farm (and then you probably have a common share between all web servers in the farm) to me a database is a little over-kill for the most part
The code samples in this post can be downloaded using the link at the bottom and were created using Visual Studio 2010. There are samples for both C# and Visual Basic.NET in the download file as well. There is an external dependency (JSON.NET) that is included in the lib folder it is used to serialize and de-serialize the SettingsStore object.
Implementation
Default.aspx page UI
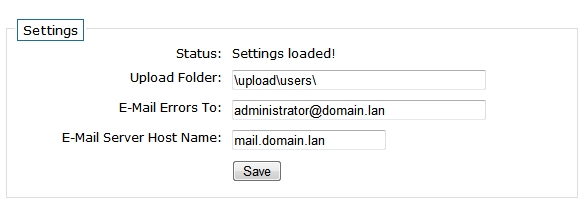
The UI is simple enough, just have a way to allow users to update the settings from the setting class.
SettingsLib Code
The SettingsLib class implements the getting and the persisting of the actual settings. By default the site_settings.config file is stored in a folder called app_data, this can be changed to anything but just remember the windows account that your website runs under must have write access to this folder for the settings to be persisted.
    public static class SettingsLib
    {
        public const string SETTINGS_FILE_NAME = "site_settings.config";

        ///
        /// Gets the current Settings object from the settings store
        ///
        /// Settings object
        public static SettingsStore GetSettings()
        {
            return JsonConvert.DeserializeObject(ReadSettingsFile());
        }

        ///
        /// Saves the settings to the settings store
        ///
        ///The current Settings object
        ///
        public static bool SaveSettings(SettingsStore settings)
        {
            return WriteSettingsFile(JsonConvert.SerializeObject(settings));
        }

        ///
        /// Reads the json data from the settings file
        ///
        /// json string from the file
        private static string ReadSettingsFile()
        {
            string settings = "{ }";
            string path = GetPath();

            try
            {
                if (File.Exists(path))
                    settings = File.ReadAllText(path);
            }
            catch (Exception) { }

            return settings;
        }

        ///
        /// Writes the json string to the settings file
        ///
        ///The json string that represents the Settings object
        /// True | False if the write was successful
        static bool WriteSettingsFile(string json)
        {
            string path = GetPath();

            try
            {
                File.WriteAllText(path, json);
                return true;
            }
            catch (Exception) { }

            return false;
        }

        ///
        /// Returns the full file path to the settings file
        ///
        ///
        static string GetPath()
        {
            string path = System.Web.HttpContext.Current.Server.MapPath("~\\app_data");

            if (!path.EndsWith("\\")) path += "\\";

            path = string.Concat(path, "\\", SETTINGS_FILE_NAME);

            return path;
        }
    }
SettingsStore Class
The SettingsStore class is just a simple class that implements your settings as an object using properties. JSON.NET will serialze most primative .net types as well collections too which makes it more flexable than using the web.config file.
    ///
    /// Class to hold all of your settings
    ///
    public class SettingsStore
    {
        public string UploadFolder { get; set; }
        public string EmailErrorsTo { get; set; }
        public string EmailServerHostname { get; set; }
    }
Code SettingsStoreSample.zip (176.40 kb)
So I decided to update my blog engine to the newest version and along with that I wrote a simple extension to detect IE6 users and redirect them to a non-supported browser page. Not that my theme cannot handle IE6 but I feel I should get on board and help as much as I can with the movement to rid the internet of this outdated browser.
The extension is pretty simple and uses the built in Response.Browser object which should work for IE6 nicely. To make an extension for BlogEngine is pretty easy just create a class with a constructor with no parameters and then wire up one or more events that the BlogEngine raises to your event in your extension class. Below is my extension class for the redirect logic.
using System;
using System.Web;
using BlogEngine.Core;
using BlogEngine.Core.Web;
using BlogEngine.Core.Web.Controls;
using BlogEngine.Core.Web.HttpHandlers;

[Extension("Redirects users with non-supported browsers to an alternate download page", "1.0", "thefrozencoder.ca")]
public class NonSupportedBrowser
{
    public NonSupportedBrowser()
    {
        Post.Serving += new EventHandler(ServingHandler);
        Page.Serving += new EventHandler(ServingHandler);
    }

    void ServingHandler(object sender, ServingEventArgs e)
    {

        HttpContext context = HttpContext.Current;

        if (context != null && !context.Items.Contains("NonSupportedBrowserTest"))
        {
            System.Web.UI.Page page = context.CurrentHandler as System.Web.UI.Page;

            if (page != null)
            {
                context.Items.Add("NonSupportedBrowserTest", 1);

                if (context.Request.Browser.MajorVersion <= 6 && context.Request.Browser.Browser.Equals("IE"))
                {
                    string file = System.Configuration.ConfigurationManager.AppSettings["NonSupportedBrowser"];

                    context.Response.Redirect(file, true);
                }
            }
        }
    }
}
As you can see in the constructor I wire up the Page.Serving and Post.Serving events to my own method. I create a context item (NonSupportedBrowserTest) and check for it because the event will be called more than once in the lifetime of the request. I also store the file name in an appSettings key/value so I can change the file to be redirected to (simple HTML file in this case). All that is required is to place the code file in the App_Code\Extensions folder and add the HTML file with the instructions to download a newer browser.
If you are looking for some ideas for this page I simply used the code from the IE6 No More website.
The following is a couple of T4 templates that I have been fooling around with in my spare time (sharing the time between jQuery, StringTemplate view engine for ASP.NET MVC and other endeavors). For the most part these templates are nothing special, they generate both the T-SQL (stored procedures) and a simple but effective data access layer. Like I said nothing special.
A good resource for starting with T4 templates is @ David Hayden site where he has a Screencast on how to use them. Below describes some of the settings used to get my simple sample up and running.
Extract the _common.tt, DataClass.tt and T-SQL.tt files from the zip and add them to your VS project in a folder (like Generation). In the _common.tt file there are some settings (variables) that you can use to modify how the code is generated. You will need SQL 2005 client tools installed on your machine as it uses the SMO object library. Once the code is compiled just cut and paste it into separate class files and run the T-SQL code on your db.
-
ConnectionString - This is your connection string to your database
-
TableName - This is the table you are going to run the code against
-
SchemaName - Use this for applying a schema to your T-SQL code if you use schemas (default is dbo)
-
ColumnsToOmit - Comma delimited list of columns to omit from the DAL code that is generated
-
NameSpace - Namespace of your application
-
ProcPrefix - Use to add a prefix to your stored procedures (ie. up_)
-
UseShortProperties - True | False to tell code generation to generate the C# short form for get/set properties
-
insertColumnsAsGetdate - Comma delimited list of column names that will automatically be assigned the GETDATE() T-SQL statement on an Insert. (Also omits the fields from the insert statement parameters)
-
updateColumnsAsGetdate - Comma delimited list of column names that will automatically be assigned the GETDATE() T-SQL statement on an Update. (Also omits the fields from the update statement parameters)
The code is supplied as is and if it's broken fix it, you're a programmer aren't you? :P
T4 Templates.zip (4.98 kb)
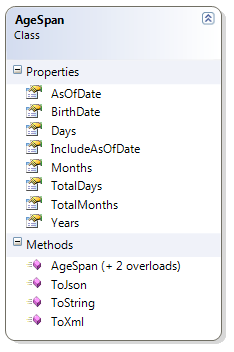
Recently I was working on a web service that required logic than needed the span of time passed in months and days based on a start and end date. I figured someone has already written this before me so why waste my time. EPIC WRONG!!!!!! While I was able to find code (mostly snippets) that did various calculations most of them were either; a) not what I needed or b) fundamentally flawed in the calculations (most choked on month/day crossovers, where the as-of-date was 1 month previous and 1 day later than the sample start date). So I decided that I would take a chapter from the TimeSpan class and create my own AgeSpan class.
This class helps answers the question how many years, months, days, total months, total days from the birth date to the as-of-date. So for example on Mar 04 2009 this class tells me I am 40 years; 5 months and 1 day old or 485 total month or 14762 total days old.
One of the options available is to set the include as of date in the days calculation. What this does is include the as of date inclusively as part of the date range. Basically it adds one day to the days and total days. So taking the example from above I would be 40 years; 5 months and 2 days old or 485 total month or 14763 total days old. This option is set to false by default.
Included in the zip is a unit test project to validate the actual logic. The class is written in c# and it probably can be ported to VB pretty easily or just use the assembly as is.
AgeSpan Class
Download the code: AgeSpan.zip (521.59 kb)
Introduction
This sample code shows how to upload an image from a local machine and then save the image into a SQL Server database and then retrieve the image and display it in the browser using a HttpHandler. The sample also has code to dynamically resize the images in the database as thumbnails in a list. This borrows code from the Image Upload using ASP.NET sample I wrote in another post.
The code samples in this article can be downloaded using the link at the bottom of this article. Samples were created using Visual Studio 2008 (ASP.NET Web Site) and using SQL Server 2005 Express. There are samples for both C# and Visual Basic.NET in the download file as well a database script in the App_Data folder to recreate the database if you don't have SQL Express installed.
Requirements
-
The user wants to be able to upload an image to the system
-
The system must have a mechanism to allow images to be uploaded and saved to a SQL Server database
-
Images must be stored in the database unaltered
-
Images must have a text description as well
-
System must be able to display the image in a variety of sizes based on the page it is being displayed
The requirements here are pretty simple and for the most part don’t require any extra decision making. For this sample we are not going to worry about some possible issues such as file size, logic to deal with files that are not images being uploaded (people fooling around with the feature) and such.
Implementation
To implement the requirements the following files have been added to an ASP.NET Web Site, below are the files that make up the solution
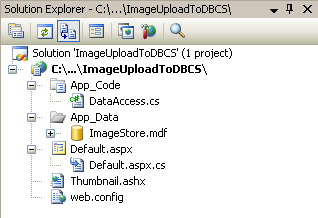
- Our data access methods will be contained in a separate class (DataAccess)
- The Default.aspx page will act as our upload page as well the listing page for our saved images
- The Thumbnail.ashx file implements IHttpHandler to allow us to stream the images to the browser in a simple way (more on HttpHandlers here)
- A connection string setting has been added to the web.config file
- A SQL Server Express database has been created in the App_Data folder to store the image data
Default.aspx Page UI
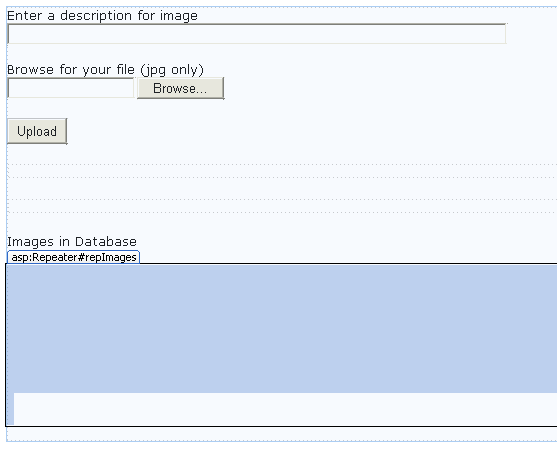
-
asp:TextBox control to enter a description of the image
-
asp:FileUpload control to select an image to upload from locally
-
asp:Button control to submit the request to upload the image
-
asp:DataRepeater control to show the list of images stored in the database
-
asp:Image control to display the actual image from the database
-
asp:Label control to display the description for the image
Default.aspx Page Code Behind
Form and Control Events

-
Line 9 – bind the repeater control to the generic list of image data items currently stored in the database
-
Line 18 – button event to trigger the upload
-
Line 24 – for each row of image information in the database this event is trigged and the ImageData class is passed in on the EventArgs. We get a reference to the Image and Label controls in the ItemTemplate of the repeater and set the properties for each.
The Handle Image Upload Code
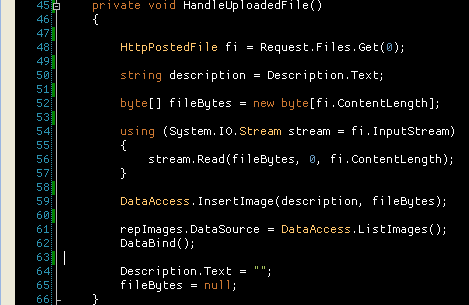
-
Line 48 – get a reference to the file being uploaded
-
Line 50 – get the description text from the text box
-
Line 52 – make sure that there is a trailing forward slash on the end of the path
-
Lines 52 to 57 – create and fill a byte array of the current uploaded file (this will be saved to the database)
-
Line 59 – call the data access layer to save the image and description
-
Lines 61 & 62 – load the new list of saved images from the database and rebind the controls
-
Line 64 & 65 – set the byte array to null and clear out the description
Thumbnail.ashx Code
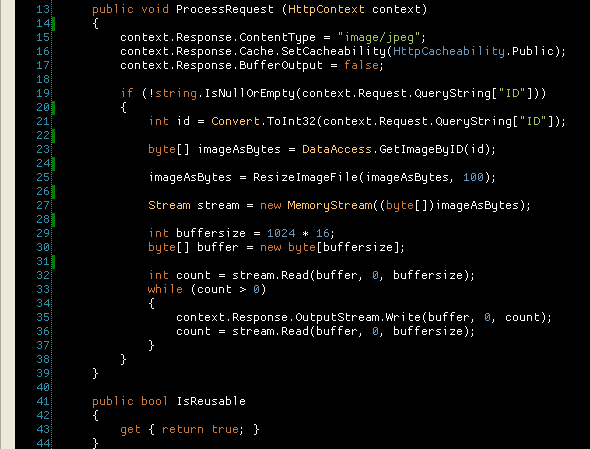
-
Lines 15 through 17 – set up the response for the content that will be returned for the request
-
Line 19 – check to see if the image id was passed in on the query string
-
Line 23 – call the data access code to return a byte array for the passed in unique image id
-
Line 25 – pass the byte array into the resize code to make a thumbnail for the saved image
-
Lines 27 through 37 - chunk the byte array from the database out to the http response object
Resize Image Logic
This logic was not written by me but copied from the Personal Web Starter Kit that is available as a download from asp.net. The new size value you ask for when calling this method will change either the height or width of the original image based on if the picture is a portrait or landscaped image this is done to maintain the aspect ratio and not have a distorted image.
DataAccess Code

The data access code is pretty straight forward; the insert will insert the image data (byte array) and description into the database, the get image method returns only one field/row from the database as a byte array.
Database Objects
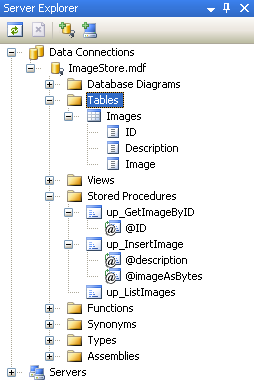
The database design is minimal a table and three stored procedures. The image data is stored as the SQL Server Image data type along with a identity field for the id and the text description. The three stored procedures are used to insert and return data from the database.
Conclusion
There are other things that could be addressed with this sample like client validation before an upload is done to make sure that the file picked has a certain extension and or if the user actually picks a file before the submit button is pressed, also the size of the image being uploaded, you may have to update the web.config to allow for a bigger file or put restrictions on the size being uploaded.
Ideally storing images (or any binary object) should be stored on the file system due to performance considerations and simplicity.
Code ImageUploadToDBSample.zip (372.71 kb)