thefrozencoder

Programming and Technology blog

Upload Image And Store In SQL Server Using ASP.NET

Introduction

This sample code shows how to upload an image from a local machine and then save the image into a SQL Server database and then retrieve the image and display it in the browser using a HttpHandler.  The sample also has code to dynamically resize the images in the database as thumbnails in a list.  This borrows code from the Image Upload using ASP.NET sample I wrote in another post.
 
The code samples in this article can be downloaded using the link at the bottom of this article.  Samples were created using Visual Studio 2008 (ASP.NET Web Site) and using SQL Server 2005 Express.  There are samples for both C# and Visual Basic.NET in the download file as well a database script in the App_Data folder to recreate the database if you don't have SQL Express installed.

Requirements

  1. The user wants to be able to upload an image to the system
  2. The system must have a mechanism to allow images to be uploaded and saved to a SQL Server database
  3. Images must be stored in the database unaltered
  4. Images must have a text description as well
  5. System must be able to display the image in a variety of sizes based on the page it is being displayed

The requirements here are pretty simple and for the most part don’t require any extra decision making.  For this sample we are not going to worry about some possible issues such as file size, logic to deal with files that are not images being uploaded (people fooling around with the feature) and such.

Implementation

To implement the requirements the following files have been added to an ASP.NET Web Site, below are the files that make up the solution

  • Our data access methods will be contained in a separate class (DataAccess)
  • The Default.aspx page will act as our upload page as well the listing page for our saved images
  • The Thumbnail.ashx file implements IHttpHandler to allow us to stream the images to the browser in a simple way (more on HttpHandlers here)
  • A connection string setting has been added to the web.config file
  • A SQL Server Express database has been created in the App_Data folder to store the image data

Default.aspx Page UI

  • asp:TextBox control to enter a description of the image
  • asp:FileUpload control to select an image to upload from locally
  • asp:Button control to submit the request to upload the image
  • asp:DataRepeater control to show the list of images stored in the database
  • asp:Image control to display the actual image from the database
  • asp:Label control to display the description for the image

Default.aspx Page Code Behind

Form and Control Events

  • Line 9 – bind the repeater control to the generic list of image data items currently stored in the database
  • Line 18 – button event to trigger the upload
  • Line 24 – for each row of image information in the database this event is trigged and the ImageData class is passed in on the EventArgs.  We get a reference to the Image and Label controls in the ItemTemplate of the repeater and set the properties for each.

The Handle Image Upload Code

  • Line 48 – get a reference to the file being uploaded
  • Line 50 – get the description text from the text box
  • Line 52 – make sure that there is a trailing forward slash on the end of the path
  • Lines 52 to 57 – create and fill a byte array of the current uploaded file (this will be saved to the database)
  • Line 59 – call the data access layer to save the image and description
  • Lines 61 & 62 – load the new list of saved images from the database and rebind the controls
  • Line 64 & 65 – set the byte array to null and clear out the description

Thumbnail.ashx Code

  • Lines 15 through 17 – set up the response for the content that will be returned for the request
  • Line 19 – check to see if the image id was passed in on the query string
  • Line 23 – call the data access code to return a byte array for the passed in unique image id
  • Line 25 – pass the byte array into the resize code to make a thumbnail for the saved image
  • Lines 27 through 37 -  chunk the byte array from the database out to the http response object

Resize Image Logic

This logic was not written by me but copied from the Personal Web Starter Kit that is available as a download from asp.net.  The new size value you ask for when calling this method will change either the height or width of the original image based on if the picture is a portrait or landscaped image this is done to maintain the aspect ratio and not have a distorted image.

DataAccess Code

The data access code is pretty straight forward; the insert will insert the image data (byte array) and description into the database, the get image method returns only one field/row from the database as a byte array.

Database Objects

The database design is minimal a table and three stored procedures.  The image data is stored as the SQL Server Image data type along with a identity field for the id and the text description.  The three stored procedures are used to insert and return data from the database.

Conclusion

There are other things that could be addressed with this sample like client validation before an upload is done to make sure that the file picked has a certain extension and or if the user actually picks a file before the submit button is pressed, also the size of the image being uploaded, you may have to update the web.config to allow for a bigger file or put restrictions on the size being uploaded.

Ideally storing images (or any binary object) should be stored on the file system due to performance considerations and simplicity.

Code ImageUploadToDBSample.zip (372.71 kb)

New personal laptop

So I have been doing my homework on laptops over the past month-ish because I wanted to replace my “desktop replacement” laptop (17” HP DV9418CA) with a more portable yet still functional for what I really use it for laptop.  Don’t get me wrong my current lappy is a fine machine (when running XP pro) and has a lot of bells and whistles but portable it isn’t and lacks in the memory dept (max 2GB).

I have owned 3 laptops over the last 5-6 years; all have been HP and never had any issues to date.  Because of this HP was top of the list for a replacement but unfortunately their latest line based on my research has had some cooling issues along with some lackluster components (LCD display, HDs) (this based on the chatter of various user forums I used for research not actual defects).

Some of my requirements were:

  • 2.0 GHz or higher dual core CPU
  • No Nvidia GPU (search for nvidia gpu die defect))
  • Supports over 4GB RAM
  • Supports Wireless B, G, N
  • Supports 10/100/1000 GB LAN
  • Supports Bluetooth
  • 15.4” (or less) LCD (matte finish) (supports 1280 x 800 or higher)

I ended up dropping the consumer grade and moving into the business class machines which are more expensive but it is all relative since the features you would pay for on a consumer machine you get automatically in a business machine for example a basic 3 year warranty.

In the end I picked the HP EliteBook 8530p, it had all of the requirements, was a name I trusted based on previous experience, was given better than average reviews on various sites that review laptops and had lots of satisfied users on the various user forums.  Also I was impressed by the actual technology that went into the design and structure of the 2008 models as seen here in this breakdown video made by HP.  Now maybe it’s all FUD but none the less I have had the laptop for a week and so far it has gone above and beyond my expectations (knock on wood).

The laptop came with no applications installed other than the HP software and the drivers which was cool; no other crappy trial-ware garbage to remove, packaging was very simple yet effective.  The machine came with Vista Business SP1 (x64) and a downgrade license for XP (x86), I stuck with Vista.  I also purchased Office 2007 Pro and bit the bullet; a 4GB PC6400 memory module from Crucial bringing the total memory to 6GB.

Note: I purchased the memory through TigerDirect.ca by calling one of the sales team directly.  Even though they don't list the memory they can purchase anything from their suppliers at a discounted cost.  The memory module ended up costing less going this route (pricing for this item on CAN sites was often over $500 bills if you could find it) than it would have buying it directly from Crucial w/exchange w/shipping w/brokerage fees, plus I got 2 day delivery on the memory for the price of ground shipping FTW!!!

Upload and Resize Images using ASP.NET

Introduction

One of the more common requests I see on various ASP.NET forums and discussion groups from new developers is how to upload an image and resize it.  This simple example does just that.

The code samples in this article can be downloaded using the link at the bottom of this article.  Samples were created using Visual Studio 2008 (ASP.NET Web Site).  There are samples for both C# and Visual Basic.NET in the download file.

Requirements

  1. The user wants to be able to upload an image to the system
  2. The system must have a mechanism to allow images to be uploaded and saved to the file system
  3. Images must be resized to conform to the layout restrictions of the site
  4. Images must be stored in a folder called “Images”
  5. Images must have a unique file name to avoid collisions from other users
  6. System  must store the original file as well as the resized image

The requirements here are pretty simple and for the most part don’t require any extra decision making.  For this sample we are not going to worry about some possible issues such as file size, logic to deal with files that are not images being uploaded (people fooling around with the feature) and such.

Implementation

To implement the requirements the following files have been added to an ASP.NET Web Site, below are the files that make up the solution

  • For this sample the Default.aspx page will act as our upload page
  • No modifications have been done to the stock web.config file

Default.aspx Page UI

The UI for the upload feature is simple

  • asp:FileUpload control so the user can select an image to upload from their computer
  • asp:Literal control so we can display a link to the uploaded original and resized image
  • asp:Button control to submit the request to upload and resize the image

Default.aspx Page code behind

Click to see full size image

We will need to add a couple of using (imports in VB) for the image handling as well as the file system handling lines, the System.Drawing and the System.IO.

Click to see full size image

The event handler for the button click

  • We check to see if the Page.IsPostBack is true which on this event is optional because it will always be a postback if the button is clicked, it is more of a coding practice than needed logic
  • If this condition is true we call the main method to handle our image upload logic

Click to see full size image

The logic to handle the image uploads

  • Line 28 – we get the actual physical path the web site is running under (this is needed so we can store the image later on)
  • Line 31 – make sure that there is a trailing forward slash on the end of the path
  • Line 35 – add our folder we will store the images in (this value could be stored in the appSettings section of the web.config file)
  • Line 38 – create the physical path to the images folder (you may get an exception here is the NETWORK SERVICE account  (or which ever account is configured to run ASP.NET applications) does not have write access to the path being created
  • Line 42 – make our link template to the created files
  • Line 45 – start looping through the files in the Request.Files object
  • Line 49 – get an instance of the current file by index id
  • Lines 52 to 58 – create and fill a byte array of the current uploaded file (this will be used to resize the image and to write the image to the file system)
  • Line 61 – create a unique file name for our image (this unique identifier could be saved to the users profile in a database to associate the image to the user)
  • Lines 64 to 67 – write the original file to the file system and update the literal control with a link to the file
  • Lines 71 to 74 – before writing the original image to the file system call the image resize logic, this will return a byte array with the resized image and then update the literal control with a link to the file
  • Line 78 – set the visibility of the literal control to true (this could be set outside of the loop by checking if the Request.Files.Count property is > 0
  • Line 79 – set the byte array to null to clean up any resources used

Click to see full size image

The logic to resize the image

This logic was not written by me but copied from the Personal Web Starter Kit that and is available as a download from asp.net.  The new size value you pass in when calling this method will change either the height or width of the original image based on if the picture is a portrait or landscaped image this is done to maintain the aspect ratio and not have a distorted image.

Conclusion

This is a simple and no nonsense approach to this common feature and there are other things that could be addressed with this sample like client validation before an upload is done to make sure that the file picked has a certain extension and or if the user actually picks a file before the submit button is pressed, also the size of the image being uploaded, you may have to update the web.config to allow for a bigger file or put restrictions on the size being uploaded.

Code ImageUploadSample.zip (628.76 kb)

Rolling Your Own Custom Authentication For ASP.NET


Introduction

ASP.NET Membership combined with Forms authentication provides a convenient way to implement page protection and user authentication.  In some cases this you may want to create your own custom authentication implementation when specific requirements do not allow the built in authentication.  This post shows the basis and a starting point of building your own custom authentication mechanism using ASP.NET.

The code samples in this article can be downloaded using the link at the bottom of this post.  Samples were created using Visual Studio 2008 and using SQL Server 2005 Express.  There are samples for both C# and Visual Basic.NET in the download file as well as a word document version of this post.

Setup

Everything needed to run the samples should be present in the download files.  Before you run the project from VS set the Secure.aspx page as the start up page, when the site is run you should be redirected to the Login.aspx automatically.  From there you can use the login information

  • Login: user@login.net
  • Password: password

There is a setting in the web.config file to control the time in seconds it takes for a user's session to expire I have set this to a low number (5 seconds) for demonstration purposes so once you are logged in and the Secure.aspx page is displayed hit the refresh on your browser a couple of times then wait 5 seconds and do another refresh, you should be redirected to the Login.aspx page since your session has expired.

Requirements

First we will take a look at some common requirements that are typical of a authenticated web site.

  • The system must be able to deny access to all pages that are defined as being secure from anonymous users.
  • The system must be able to authenticate / validate a user before they have access to secure pages
  • Once a user has been authenticated the user will not have to enter credentials again to access secure pages
  • If the user is inactive for x minutes the system will log them out and they will have to login again
  • The logged in session for a user will only be active for the duration of the browser session or until requirement 4 has been met.

Based on our requirements we are going to need a way to store user information; specifically the login and password information.  As well we will need to store some form of a security token that the system creates after authentication and stores a copy of that token in the system as well on the user’s machine.  We store the systems copy of the token in a database and clients’ copy of the token in a cookie (this will cause issues if the client does not allow cookies but for this article that will not be addressed).  We will also need a simple way to implement our security logic for pages that need it.

System Database

Below is the system database tables to store the user information as well as a copy of the security token.

ClientData Table

  • ClientID - will store the unique identifier for the client (used internal to the system)
  • FirstName - will store the users first name
  • LastName - will store the users las name
  • Login - will store the user's login
  • Password - will the users password (tipically the users password is stored encrypted rather than plain text like in this sample)

ClientSessions Table (will store the security token for the user)

  • SessionGuid - will store the system created security token, this value must match the same token on the clients computer (cookie)
  • ClientID (optional) – will store the unique id from the ClientData table for the authenticated user (in some cases this cannot be stored as it may violate privacy laws by uniquely identifying a users session on a site)
  • SessionLastActiveDate – will store a timestamp when the last time the users session was validated
  • SessionTimeOut – will store in seconds how long since the last time the users session was validated before it will expire

User Validation

User validation takes place on the Login.aspx page when the user enters their credentials and the page is submitted.  The system will then query the ClientData table to find a match for the given login and password.  If a match is found the system then creates a security token, saves the token to both the system and the user’s machine via a cookie.  The system then redirects the user to one of the secure pages within the site.  If a match is not found the Login.aspx page displays a message to the user.

Session Validation

Session validation takes place whenever a user browses a page that is considered to be secure.  The page will ask the system if the user has validated by querying the ClientSessions table using the security token from the user’s cookie and match that token to possible existing token stored in the ClientSessions table.  If the session timeout has not expired since the last validation the session is updated with a new last active timestamp.  If the session has expired the user will be forced to the login screen.

Implementation

To implement the logic the following files have been added to an ASP.NET Web Site and shown below is the files that make up the solution

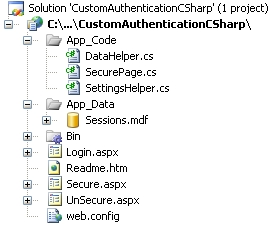
  • The SecurePage Class will implement our authentication logic and be implemented by each of the pages in our site
  • The DataHelper Class implements the data access to the system database
  • The SettingsHelper Class implements the data access to the web.config file for any configurable settings
  • The Sessions.mdf is the database where we will store our user data and the user token
  • The Login.aspx page is interface the user will use to authenticate
  • The Secure.aspx page is a page that the a user must authenticate first to view
  • The UnSecure.aspx page is a page that a user does not have to authenticate to view
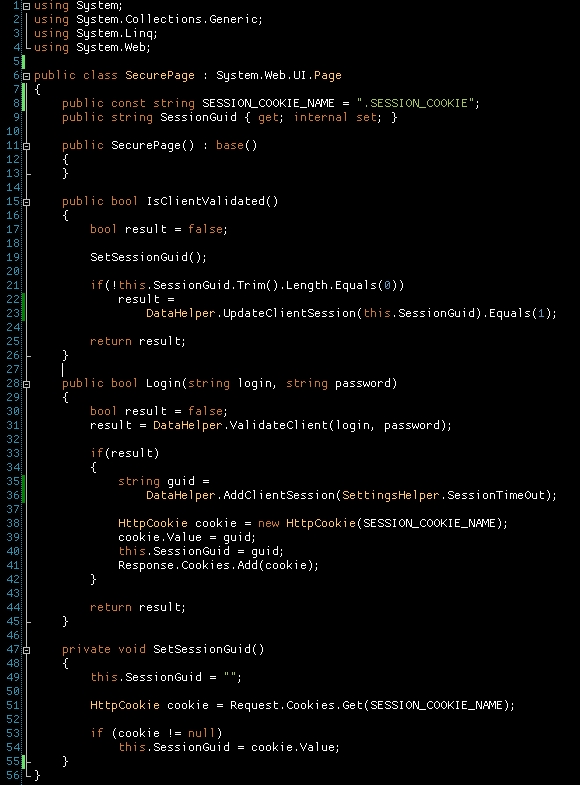
SecurePage Class

Below is the implementation of the SecurePage class which all of pages in our site will implement.

  • Line 15 – implements the call made by secure pages to check if the user has been validated by the system to see the current page
  • Line 28 – implements the call made by the Login.aspx page to validate the user against the data in the ClientData table
  • Line 47 – implements an internal call to get the security token from the user’s machine (cookie)
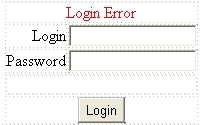
Login.aspx Page UI

The basic login page UI

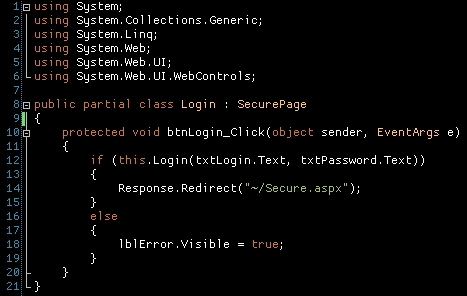
Login.aspx Page Code Behind

  • Line 8 – The Login page class implements the SecurePage class to implement the methods for our authentication
  • Line 10 - The login button click when the user clicks on the login button the page calls the Login method passing in the values from the login and password text boxes.  If successful the page redirects to a secure page if not displays the user error message

Secure.aspx Code Behind

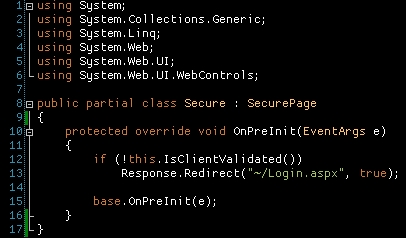
  • Line 8 – The Secure page class implements the SecurePage class to implement the methods for our authentication
  • Line 10 – The OnPreInit method is overridden so we can call the IsClientValidated method to check if the user has been validated to see the secure page.  If the user has not been validated it redirects to the Login.aspx page otherwise the Secure.aspx page displays as normal

Conclusion

There are other things to consider that are beyond the scope of this article such as using SSL for the login and or secure pages, encrypting persistent data (either cookie or user data), etc.  This by no means is a complete solution but describes the basics in creating custom authentication for an ASP.NET based web site.  This may not be the holy grail of custom authentication but it does offer a few ideas and solutions to implementing your own custom authentication when the built in membership and forms authentication does not fit well with your requirements.  Now you could just have implemented the server storage in a session item and just compared the users cookie value to the session item which would work too but what if your web site is running under a web farm and load balanced?  Unless you use a state server or sql server to store your state you will need a way to persist your authentication in a more permanent or statefull way.

** Note **
The data access layer used is the Microsoft Patterns and Practices Enterprise library which can be downloaded here http://www.codeplex.com/entlib I have encluded only the required assemblies in the download file you may need to download the entire package in order for the samples to run.

Code samples CustomAuthentication.zip (1.49 mb) 

New Year and New Hosting Part Deux

Sigh......
The MX entry for mail.thefrozencoder.ca is screwed up just like my mail.willyd.ca was.

In my last post I gave you my thoughts and gripes about Lunarpages.com, this post is an update to that original post.  I will be adding to it as the story unfolds and as I keep checking mail.thefrozencoder.ca to see if they have fixed the issue completely.  The fact that they don't allow me to manage my own DNS zone is kind of a buzz-kill.  I may end up just purchasing my own DNS services from my registrar ($8 CAN/yr/domain) and be done with it, this way I have complete control.

The Good

  • They offer an alternate SMTP port for ISPs that block outgoing port 25

The Bad

  • Their support staff although courteous read from the script to much and don't investigate issues as much

Here is my abbreviated ticket thread to date on the DNS configuration issue.

Me
I am having issues with my DNS and mail.thefrozencoder.ca is resolving to my web server address, here is the IP info from my pings.  Also mail.thefrozencoder.ca has two IP addresses assigned to it and I am sure that one of them is wrong and please see ticket #XYZ I had the same issue on another domain which had the same DNS issue.

Support
Please answer the following questions (all related to how I have my email client configured)

Me
I give them the info they requested

Support
Please try these settings (one of which is the alternate SMTP port and an alternate mail.* server address to try)

Me
Tried the settings but mail.thefrozencoder.ca still does not work, but the alternate mail.* address does (I now add the output from a DiG showing them that mail.thefrozencoder.ca has two IP addresses assigned to it)

Support
The problem is with your DNS settings. You have two IP addresses assigned to mail.thefrozencoder.ca and extra NS entries which are not needed, you will have to remove them (WTF? didn't I just say that twice already?)

Me
And how do I remove them?  You guys are administrating my DNS for me I am just pointing my domain to your name servers via my registrar.  Are you telling me that I have to get external DNS services for your hosting environment?  If that is the case you probably should have mentioned that when I was signing up.

Support
We can change the mail.thefrozencoder.ca records, I apologize I was referring to the extra DNS entries you will have to remove them (again how am I to change my DNS entries when they manage them?)

Me
Ok please remove the duplicate mail.thefrozencoder.ca and I don't know how the extra DNS entries are showing up since there are only two entries in my registrar which are correct based on what you gave me.  Please advise.

As of 2008-12-29 18:45 (10hrs) after I noticed the issue still exists; mail.thefrozencoder.ca is incorrectly configured as per DiG.

As of 2008-12-30 00:21 (16hrs) after I noticed the issue it has finally been fixed.  Fixed by someone in supoort who actually used DiG and thanked me for noticing the other DNS issues as well (which were fixed too).