thefrozencoder

Programming and Technology blog

Installing a 3rd party expansion bay in my laptop

I recently purchased a 3rd party expansion bay caddy (replacement part AK868AA) for my HP EliteBook 8350p laptop so I could have two HD's as well upgrade my original HD to a 7200rpm larger drive.  I would end up installing the new HD as my primary and use the original as a secondary "data" drive for music, videos, VM's and other large files.

I purchased the expansion bay caddy from a 3rd party company (NewmodeUS.com) off of their eBay store and had no problems with the transaction.  Upon receiving the caddy I also noticed that there were no instructions but really how hard can it be right?

Actually I did have one issue when I went to install the caddy into the laptop, it involved a little extra work so I found.  Below is the process I used to install the HD into the caddy and into my laptop.  It does not explain how to remove the original HD and replace it with the new HD.  HP has manuals for that on their site.

The following steps are done at your own risk and I cannot take any responsibility if any damaged is caused by you or to your laptop.  To make things easier my laptop was sitting with the battery compartment facing up or away from me.

Step 1: Remove the battery from the laptop.

Step 2: Remove the original expansion bay caddy (the one that holds the DVD player) by unscrewing the screw that fastens the expansion bay caddy to the laptop chassis and using a flat head screw driver push on the silver tab in the picture to the left to pop the caddy out far enough so you can remove it (see image below as a reference).
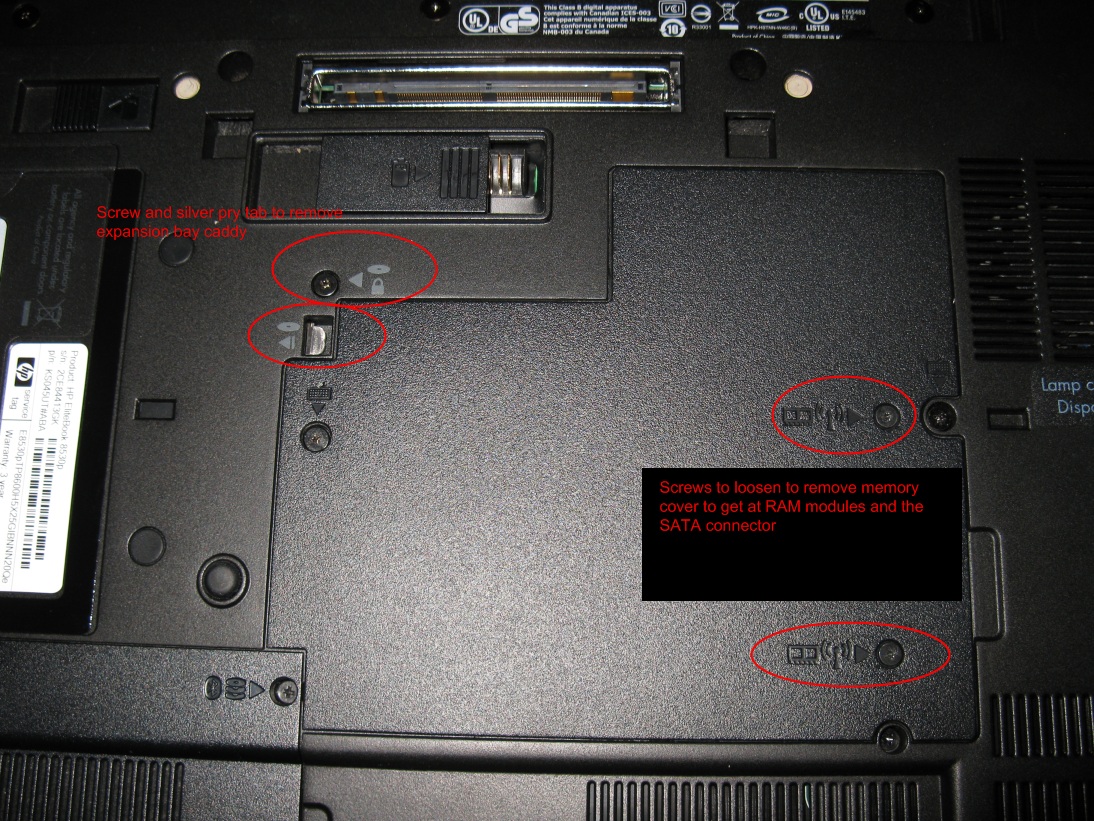
Step 3: Prep your new expansion bay caddy by installing your new hard drive, make sure to screw the HD to the caddy and transfer the fastening mounting bracket from the existing caddy to your new caddy using the supplied screws
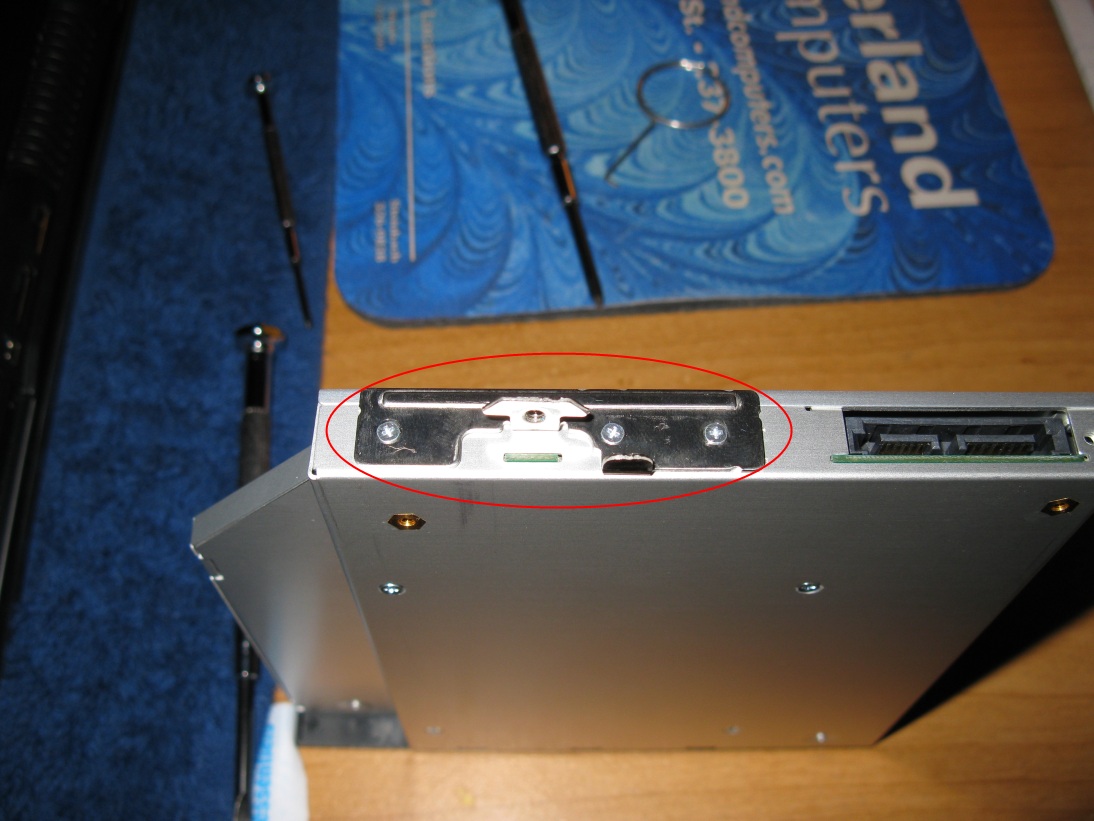
Step 4: Use 3 screws from the supplied screws and fasten your new expansion bay cover, there are 3 screw holes on the bottom of the expansion bay caddy so that the case stays closed.

Step 5: Slide the expansion bay caddy into the expansion bay is flush with the laptop case or until you feel it cannot go in anymore.  The silver tab you pried to release the caddy should be visible in the slot, if you do not see the little silver tab then you may have to follow steps 6 - 9.

Step 6: Remove the memory cover by unscrewing two screws pictured below and lift and slide the cover to the right.

Step 7: If you have memory in the bay closest to the expansion bay caddy (left memory bay) you might want to remove it by prying the two sliver retainers  on each end of the RAM module away from the center of the RAM module, the RAM module will pop up at an angle so you can remove it.
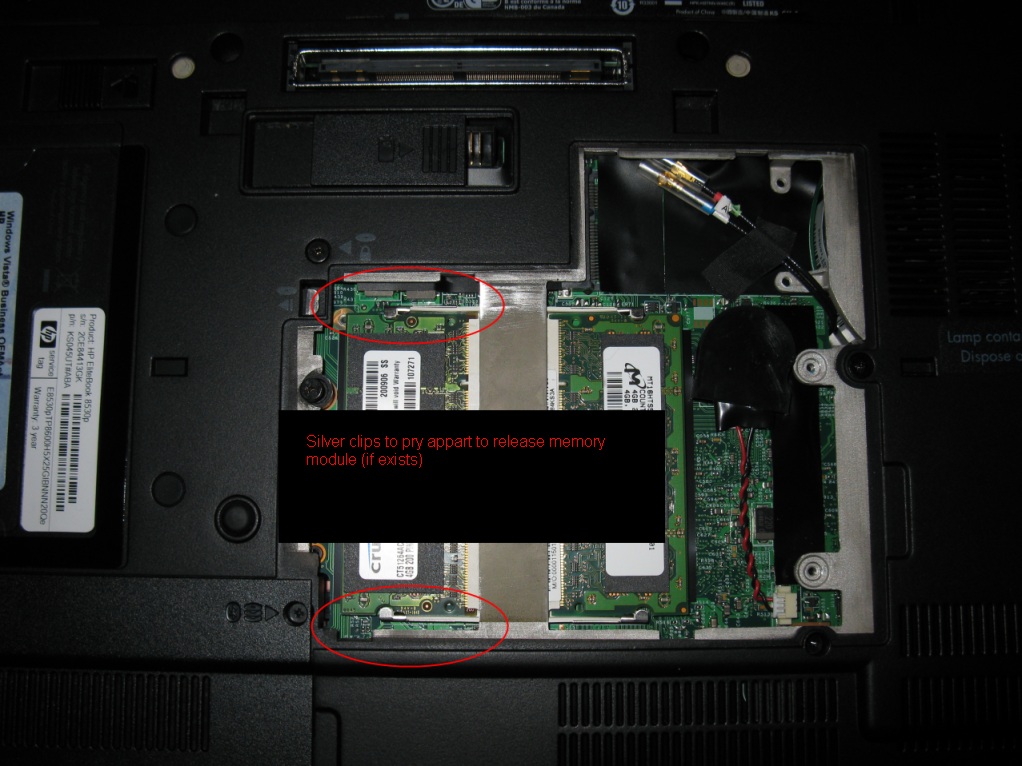
Step 8: If you look at the picture below you will see the grey connector (circled in red), this is the expansion bays SATA connector (do this by looking inside of the laptop at an angle toward the expansion bay slot).
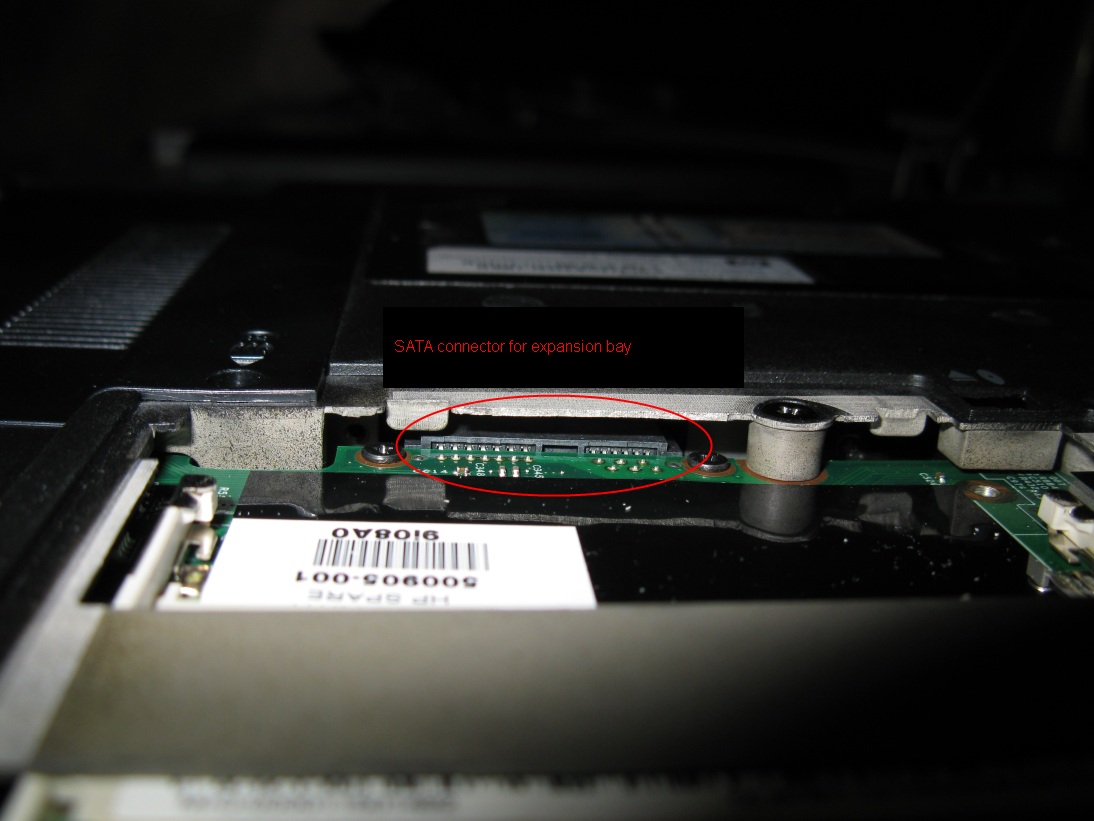
Step 9: Slide the expansion bay caddy into the slot until it stops.  Slide the flat head screw driver under the chassis so that it rests on the SATA connector then lift up on the screwdriver using the chassis as a leverage point so you can carefully push the SATA connector downwards slightly.  At the same time push the expansion bay caddy in.  The caddy should slide the rest of the way in (it did in my case but your mileage may vary based on the laptop model).  You now should see the little silver tab you had to pry to get the DVD player out.

Step 10: Once this is done screw the fastening screw down and put back all the covers/memory/screws you removed.

Turn on your laptop and hopefully you should see your new drive.

Note: if you were like me and you made the new HD your primary drive and used the original HD as the drive to go in the expansion bay you will need to go into the BIOS and make sure the expansion bay device is NOT the first device to boot from in the list.  If you don't well your old HD will boot.

Note: Because the second drive is not buried in the laptop you will notice the noise when the second drive is being accessed, it is no way louder than the DVD drive when being accessed but you will notice it if you are copying large or a large amount of files to and from it.

New personal laptop

So I have been doing my homework on laptops over the past month-ish because I wanted to replace my “desktop replacement” laptop (17” HP DV9418CA) with a more portable yet still functional for what I really use it for laptop.  Don’t get me wrong my current lappy is a fine machine (when running XP pro) and has a lot of bells and whistles but portable it isn’t and lacks in the memory dept (max 2GB).

I have owned 3 laptops over the last 5-6 years; all have been HP and never had any issues to date.  Because of this HP was top of the list for a replacement but unfortunately their latest line based on my research has had some cooling issues along with some lackluster components (LCD display, HDs) (this based on the chatter of various user forums I used for research not actual defects).

Some of my requirements were:

  • 2.0 GHz or higher dual core CPU
  • No Nvidia GPU (search for nvidia gpu die defect))
  • Supports over 4GB RAM
  • Supports Wireless B, G, N
  • Supports 10/100/1000 GB LAN
  • Supports Bluetooth
  • 15.4” (or less) LCD (matte finish) (supports 1280 x 800 or higher)

I ended up dropping the consumer grade and moving into the business class machines which are more expensive but it is all relative since the features you would pay for on a consumer machine you get automatically in a business machine for example a basic 3 year warranty.

In the end I picked the HP EliteBook 8530p, it had all of the requirements, was a name I trusted based on previous experience, was given better than average reviews on various sites that review laptops and had lots of satisfied users on the various user forums.  Also I was impressed by the actual technology that went into the design and structure of the 2008 models as seen here in this breakdown video made by HP.  Now maybe it’s all FUD but none the less I have had the laptop for a week and so far it has gone above and beyond my expectations (knock on wood).

The laptop came with no applications installed other than the HP software and the drivers which was cool; no other crappy trial-ware garbage to remove, packaging was very simple yet effective.  The machine came with Vista Business SP1 (x64) and a downgrade license for XP (x86), I stuck with Vista.  I also purchased Office 2007 Pro and bit the bullet; a 4GB PC6400 memory module from Crucial bringing the total memory to 6GB.

Note: I purchased the memory through TigerDirect.ca by calling one of the sales team directly.  Even though they don't list the memory they can purchase anything from their suppliers at a discounted cost.  The memory module ended up costing less going this route (pricing for this item on CAN sites was often over $500 bills if you could find it) than it would have buying it directly from Crucial w/exchange w/shipping w/brokerage fees, plus I got 2 day delivery on the memory for the price of ground shipping FTW!!!

HP Pocket Media Drive

A couple of weeks ago I purchased a HP Pocket Media Drive Model: PD2500s as a way to store large files (iso, vhd, gho, etc.) so that when I can:

  • Have a place to store my Virtual Hard Drives
  • Have a place to store my CD images
  • Have a place to store the last image of my laptop incase I need to restore
  • Have a quick place to do one off backups
  • Have a device that is small enough and large enough to store extra files I ma need on the road

So far the unit has performed flawless, I have no issues running my VM's or mounting ISO's from the drive and I don't really notice any performance issues.  The drive itself is pretty compact (being a 2.5" drive) and the case only adds about an inch more to the over all length of the drive.  The only issue I have is not with the drive but with the cable that came with it.

Most generic 2.5" drive enclosures come with two separate cables, one for data and one for power.  This drive comes with one cable but has two USB ends and one end that plugs into the drive (see Picture below).


The issue is the two plugs need two USB ports closer than 6.5” inches or you are forced to purchase an extension cable.  This is probably fine for most tower setups but a lot of laptops (older ones) don’t have two USB ports that close together.  Fortunately my HP does but I can see how this might cause issues for users who may have an older laptop.

Windows 2008 Install Tip for HP Laptops

If you are going to do a manual install of Windows 2008 and or Vista on any HP laptop you probably want to burn the c:SwSetup folder to a DVD/USB Key before you begin. This folder contains all of the original software installed as well as all of the drivers. Once you have installed the OS you can copy the folder back to your C: drive.

Here is a little trick to make the install process easer, create a text file in the c:SwSetup folder and rename it to install.inf. If you are missing drivers for some of your hardware (audio, network lan and wireless) are the usual MIA drivers. Just use the Update Driver feature and make sure you browse for a location and select the c:SwSetup folder, because the *.inf file is present you can do this. The update driver feature will search all subfolders for *.inf files to find a matching hardware device id and install the drivers for it. I do this so that I don’t have to pick each folder separately.

Windows 2008 and Me No More

So I decided that the disappearing mouse issue bothers me to much and went back to Windows XP (but not before making an image of the partition incase I wanted to go back after SP1 is released).

Of course before that I had to try the Vista image that came with the laptop, so I reinstalled it and BOOM, same problem.

Ahh Crap...

Oh wait maybe I’ll install SP1 for Vista and see it that helps. So after several reboots and a half an hour later I came to the conclusion that Yay! The disappearing mouse problem on my HP Laptop with an Nvida chipset using Dual Display is fixed (in my case) by installing Vista SP1. Sorry if that felt a bit wordy but search engines love wordy.