So I decided to dump Visual Source Safe (VSS) and move to something that is more robust and is pretty easy to setup. Poking around the internet it became pretty clear that VisualSVN would be my choice mostly because of its integration with Active Directory. I never liked that fact that in VSS stored it’s user info and settings in a plain text file and anyone who had access to it with modify privileges could change anyone permissions. This is not really a tutorial but a means to show interested developers and IT professionals just how easy it is to install VisualSVN and integrate it with your Active Directory model.
-
Pre-Amble
-
Pre-Setup
-
Installation
-
Post-Installation
-
Active Directory Setup
-
NTFS Setup
-
Conclusion
Pre-Amble
The version of VisualSVN I ended up installing is v1.6.2; the server environment is Windows 2003 Standard (32bit). Active Directory installed and fully configured.
Pre-Setup
If you are like me the first thing you will want to do is create a location for your Repositories. Since my file server has a data drive (d:) it made sense to create in on that drive so I could do backups from it. So I created the folder structure [D:SourceControlRepositories].
Installation
When you download the latest msi from the site it informs you that to setup VisualSVN you need to install TortoiseSVN as well. This is actually not true as TortoiseSVN is just a visual GUI to access the SVN server. You will need a SVN client like TortoiseSVN add/check in/out files unless you download one of the few VSS provider plug-ins for Visual Studio if development integration is your primary goal.
When you run the installer these are your only options to configure VisualSVN server:
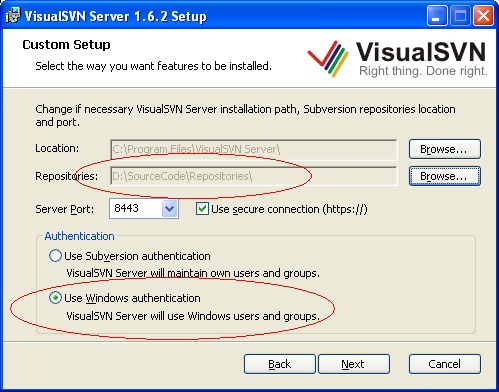
Change the Repositories folder to the folder you created in the Pre-Setup section
Change the Authentication to Use Windows authentication
You may want to change the port number if you have some kind of internal numbering scheme for ports but remember VisualSVN uses a fully configured version of apache so you will not need to integrate it with another web server.
When you select the Next button the install will start and eventually complete.
Post-Installation
Once the setup is completed you will be asked to launch the MMC snap-in for configuring the VisualSVN server (note at this time there is no way to configure remote VisualSVN servers if you are looking to install VisuaSVN on a Windows 2008 Core install. It is however something will be available in the future based on traffic on the VisualSVN Google groups).
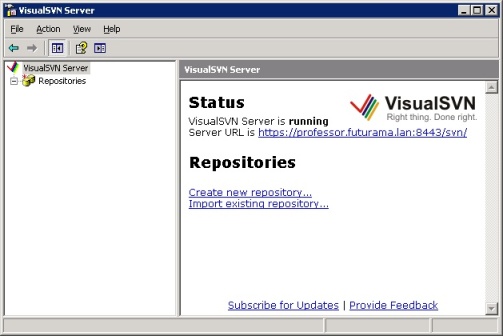
Once the MMC launches you can configure the VisualSVN server further as well us it to create new repositories. You should read the Recommended Repository Layout support topic on best practices on configuring a layout structure when creating Repositories.
When you click on the Server Url in the right hand window you will be taken to the web site of your VisualSVN server. You will get the common “There is a problem with this website's security certificate.“ error in your browser. This is due to the SSL certificate that is assigned to the apache web server on install, which is a self-signed certificate.
You will also be challenged with a ACL user name / password prompt. This information is the same as your domain login since you selected to use Windows authentication. By default the setup adds the Builtin/Users group from your domain for the ACL list.
Active Directory Setup
To change the ACL groups highlight the Repositories node in the left window -> right click -> properties. There you will see a common security window you can add or remove groups from your domain.
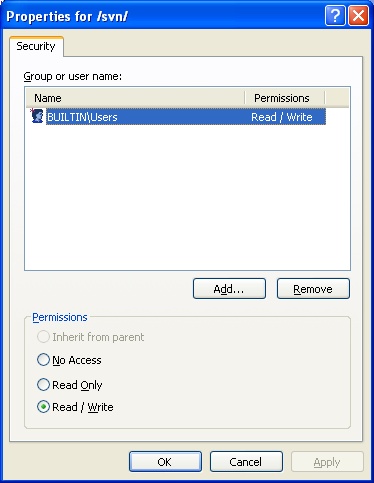
How I configured my setup was to create a single group in my AD called Software Developers and add users to this group so that only users in this group can access the VisualSVN server. Depending on your AD requirements you may implement it differently. One of the nice things about this setup is the fact that the VisualSVN server runs as a service (by default under the LocalSystem account).
NTFS Setup
As I mentioned in the Active Directory Setup section the VisualSVN server runs as a Windows Service under a privileged account. You will also need to set up your ACL for the SourceCode folder to allow the groups access to read and write permissions.
Conclusion
The entire install was pretty easy and intuitive and with the AD integration it is a breeze to configure and secure. The only extra thing I did was to create an actual certificate request from the VisualSVN Server Properties window -> Certificates Tab and submit that request to my AD Certificate server. I then imported the certificate once I authorized it. What this does is for users that are AD authenticated you will not get the SSL certificate error in your browser or probably any other application that uses SSL to access the server.
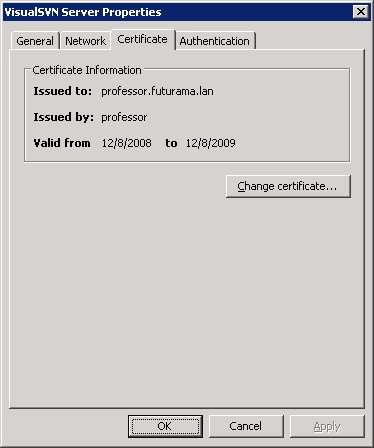
As you can see here I have a valid certificate that is authorized within my AD network and thus no more certificate errors