In my last post The Hyper-V n00b Experience I gave my experiences with setting up a couple of guest OS's in Hyper-V. This post will be geared towards how I setup my network configuration for Hyper-V or rather how I changed the mess that I made with the first setup so I decided to start from scratch. By no means is this a definitive guide as to how to setup multiple NICs for for a VM environment, like the title says I am a n00b at this so take it with a grain of salt.
First thing first; networking in Hyper-V is not as black and white as most might think, there are some changes and when configuring your Hyper-V server for networking for the first time will make some changes to your current network configuration that will make you go hmmmmm.....
Before you do configure networking you check out the following blog posts as they all offer a really good insight and explanation of how it all works.
References
Now my setup has two NIC's involved so while it does not make it any more difficult it does add couple of extra configurations steps to make it correct. The reason I installed two network cards is not for redundancy but to have one NIC dedicated to the OS and one dedicated to the VM's. This is not a requirement but it makes making networking changes on the VM side of things way easier if you want to go totally hardcore with your VM environment.
In the Begining
So this is what my Network Connections list looks like before I do anything
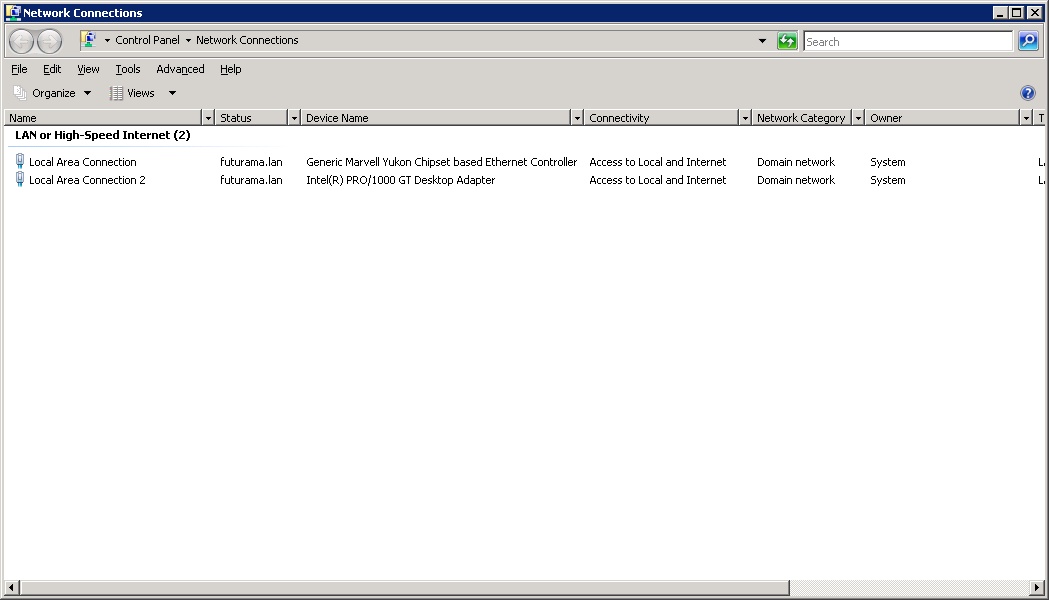
"Local Area Connection" is the onboard NIC and will be used as the dedicated OS connection to my network
"Local Area Connection 2" is the add-on NIC and will be used as the dedicated VM connection
Personally I always change default names to something more meaningful on any server I setup so I change "Local Area Connection" to "OS Network Connection" and I leave the 2nd alone for now because the meaning will change in a couple more steps.
Setup Hyper-V to use a NIC
Next change the Hyper-V settings to use the add-on NIC for it's connection. Open up the Hyper-V Manager and highlight the server on the left then right click -> and select Virtual Network Manager. The following dialog box with be visible.

Select External Network and hit the Add button; you will get a dialog box similar to this but I have already filled in some of the options for my configuration.
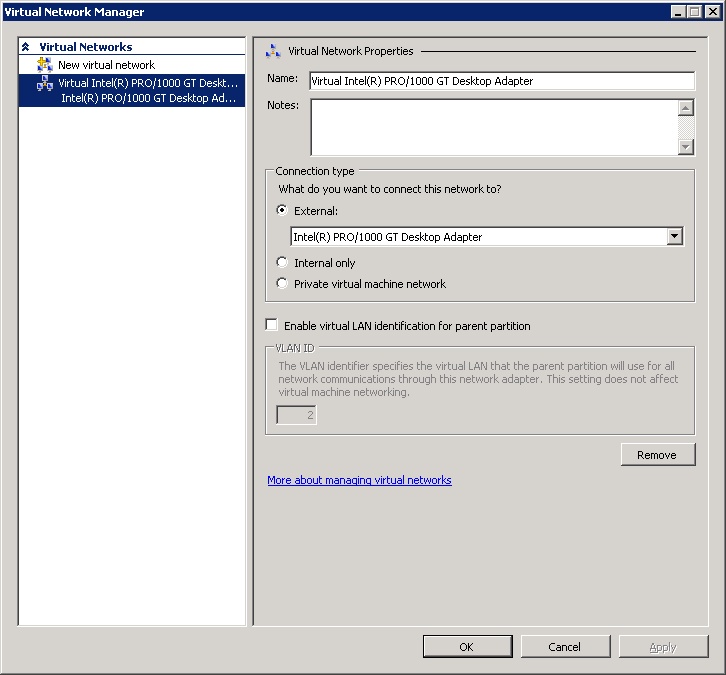
The virtual network name I used is the same name as the physical NIC according to Windows; I added a "Virtual" prefix to it for more of a readability standpoint. This name actually maps to the Device Name property in the Network Connections list. Again I like to have meaning to names.
Connection Type: External uses the physical NIC "Local Area Connection 2" (the Intel Desktop Pro NIC). Hit the Ok button.
So what really happed?
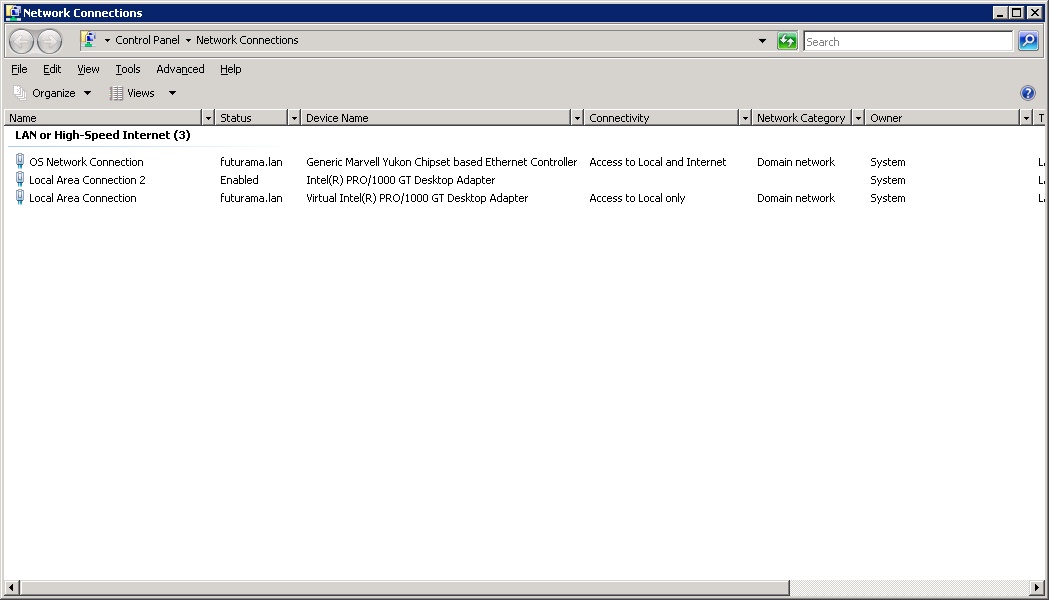
Looking at the Network Connections you can see a new network connection "Local Area Connection" and the device is the Virtual Intel(R) PRO/1000 GT Desktop Adapter, the same one setup in the Virtual Network Manager. The original "Local Area Connection 2" is now a virtual switch and the "Local Area Connection" is a virtual network adapter that is connected to the virtual switch. When configuring VM's this will be the virtual network adapter for used to bind to for connectivity.
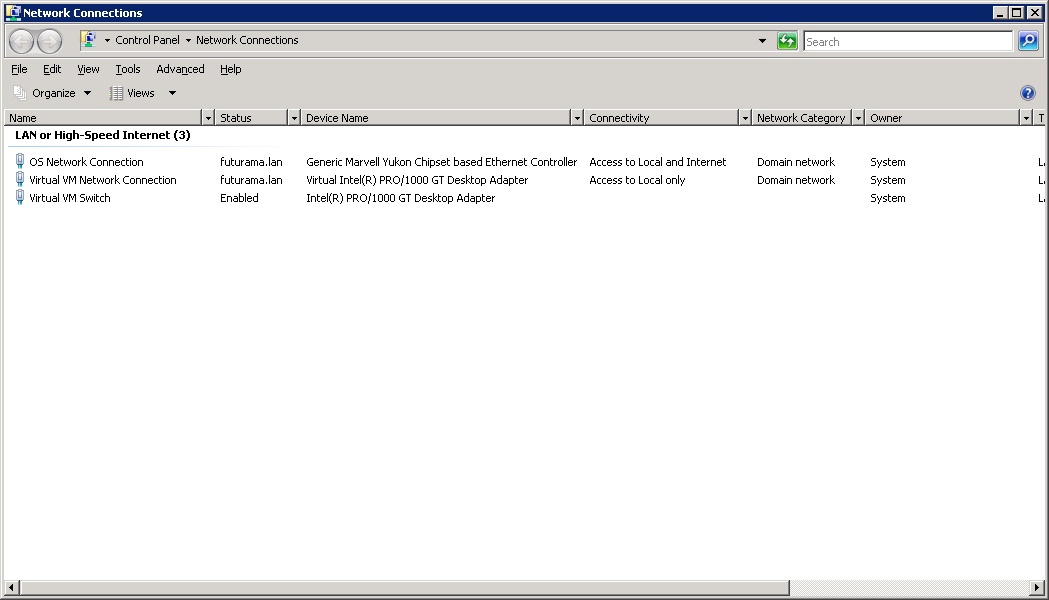
Name change time
The new Virtual VM Switch device properties
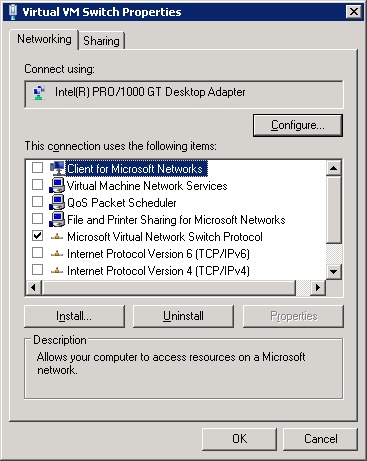
The Virtual VM Switch (original "Local Area Connection 2") has only the Microsoft Virtual Network Switch Protocol enabled, this is normal. The physical NIC is now configured as a virtual switch.
The new Virtual MV Network Connection Properties

The new network connection or "virtual adapter" for my VM's by default has TCP/IP enabled and obtain IP via DHCP enabled, this is not what you want when running two physical NICs. What you want to do is disable all of the bindings from the virtual adapter (like in above picture) so that it is basically useless from the host or parent partition standpoint. Remember the VM's will be linked to the virtual switch which routes through the second physical NIC (Intel desktop). Removing all of the bindings allows for a straight pass though effect as well not allowing the physical host to use the NIC in any shape or form. Which is the desirable effect for me since it's not about redundancy. More about this setup can be read on John Howard's virtualization blog and comments Hyper-V: What are the uses for different types of virtual networks?.
Re-Configure existing virtual machines
After this was completed I then had to update my current VM's to use the new network adapter (remember this is a fix for the rushed original setup). To do this it's as easy as opening up the settings for each VM and change the Network Adapter settings to the new virtual adapter. When you open up an existing VM you will notice that there is a Connection Error for the adapter, this is normal since I changed the virtual adapter. This is what my VM settings look like now:

All in all it was a pretty good learning experience and I now have a better understanding of how Hyper-V implements it's networking. My VM's can now get out on my network and the internet and the separate NIC is dedicated for VM use only.